Lego Amusement Park
LEGO®, Technic,Mindstorms, Robotics Invention System, and RCX are trademarks of the LEGO® Group of companies,which does not sponsor, authorize or endorse this site. Visit the official LEGO® website at http://www.LEGO.com.
5th Grade Lesson Plans
The following set of lesson plans were created by Mrs. Kenya Taylor-Wash and Mr. Alan Mays, 5th grade teachers at Otis E. Brown School #20, Indianapolis Public Schools. The plans utilize Lego Mindstorms and Robolab software and are the culmination of a format that was originally designed for use in a "camp" setting, where the children were allowed to work on projects for approximately 5 hours a day over a 1-week period. Mrs. Taylor-Wash and Mr. Mays reconfigured some of these projects, reducing them to a two-week set of lessons that require approximately 1.5 hours per day. All of the lessons integrate math, science, and language arts and cover numerous Indiana State Standards.
This project was funded by an Institute of Electrical and Electronics Engineers Foundation grant. The grant and the "camp" format were designed and taught by Professor William Conrad, School of Engineering and Technology, Indiana University Purdue University Indianapolis (IUPUI). This particular class, Lego Robotics was offered to children in grades 5-8 through the IUPUI Young Scholars program, a summer program administered by the IUPUI School of Education. The Young Scholars Programs offer various educational opportunities for children in grades 1-12.
Day 1
Lego Construction Parts
Essential Skills: Students will be able to distinguish between a brick, beam, plate, bushing, axle, tire, hub, and pulley; utilize pieces in the kit to give outcomes of experimental probability; use journals to reflect on the lesson.
Engagement Activities:
- Place students in small groups (pairs if possible).
- Using the pieces from both kits, each group will compete to create a free-standing tower.
- Introduce vocabulary terms: brick, beam, plate, bushing, axle, tire, hub, and pulley. Students will match each picture to the appropriate term. Students will verbally explain the relationship between bricks, beams, and plates (Example: What is the difference between a 1 X 8 plate and a 1 X 8 beam?).
- Present a mini lesson on probability. Students will verbally explain the ratio of certain pieces in comparison to the whole group. (Example: 4 red beams out of 22 beams, 4/22)
- Present a mini quiz on vocabulary terms, relationship of pieces, and probability.
- Students will write in their journals about what they have learned and what they would like to learn in the next lesson.
- Allow time for students to clean their areas and put all parts away.
Assessment: teacher observation, mini quiz, journal writing
Adaptations: teacher proximity, cooperative grouping
Materials: Mindstorms For Schools, Robo Technology Set and Amusement park set, Robolab 2.5 Software, attached pictures and worksheets
Math Standards: 5.4.9, 5.6.1, 5.6.4
Reading/LA Standards: 5.5.6
Science Standards: 5.2.3, 5.2.4, 5.5.1, 5.2.7, 5.2.8
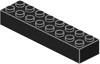
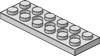
Construction Parts List
Paste the picture to match the words.
|
Axle |
Tire |
Hub |
1 x 4 Plate |
2 x 6 Plate |
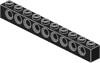
1 x 10 Beam |
2 x 8 Brick |
Day 2
The RCX Box
Essential Skills: Students will be able to identify the RCX box and become familiar with the information on it; identify wires and recognize the differences in size; identify the motors and determine the direction the motor turns and how to reverse the direction it turns; use journals and handouts to reflect on the lesson.
Engagement Activities:
- In the same small groups introduce the students to the RCX box. Read through the Introduction to RCX with students.
- Have students read through and complete handouts 3A-4A. Conduct a whole group discussion.
- Students are to create a movable object using LEGOS and the RCX box.
- Students will write in their journals about what they have learned.
- Allow time for students to clean their areas and put all parts away.
Assessment: teacher observation, journal reflections
Adaptations: teacher proximity, cooperative grouping
Materials: Mindstorms For Schools, Robo Technology Set and Amusement park set, Robolab 2.5 Software; handouts attached
Math Standards: 5.4.9
Reading/LA Standards: 5.2.1, 5.2.2, 5.2.4, 5.4.5, 5.5.6
Science Standards: 5.2.3, 5.2.4, 5.2.7, 5.2.8, 5.5.1
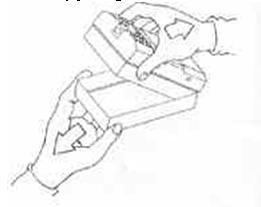
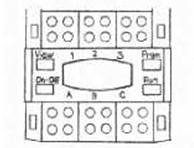
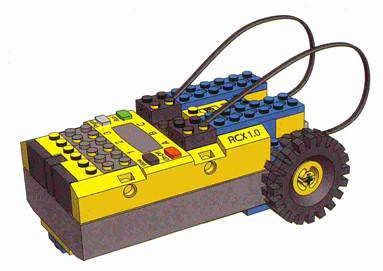
Introduction to RCX
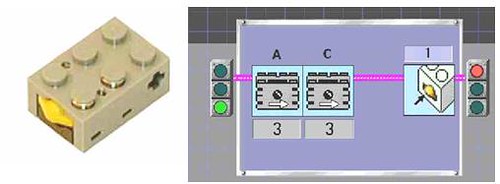
The RCX is a programmable LEGO brick which can control motors and lights and process input from sensors.

1. Open the RCX by pulling the back cover from the rest of the unit.
2. Insert 6 AA batteries then replace the back cover or use a transformer adapter.

3. Find two motors and two wires in your kit.
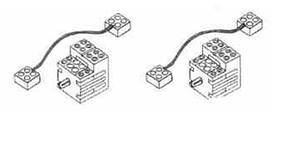
4. Attach one end of each wire to each of the motors.

5. Attach the other end of each wire to the RCX unit, to Ports A and C

A, B, & C are Output Ports which are connection points for LEGO motors and other peripherals such as lamps.
6. Find two of the smallest wheels in your kit and attach one to each end of the axle on the motor. (This makes it easier to watch the direction of rotation.)
The RCX can store 5 programs at time. The first 2 are demonstrations. You should use programs 3, 4, or 5 for your programs.
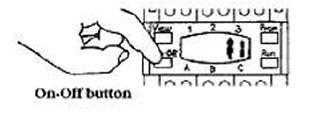
7. Press the red on-off button. What happens?
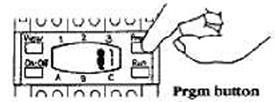
8. Press the Prgm button until a 1 appears. What do you think Prgm means?
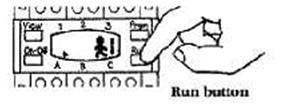
9. Press Run to run built-in Program 1. What happens?
10. In which direction do the motors turn? (clockwise or counterclockwise)
11. Press the Run button again. What happens?
12. Switch the wire connection on Port A 180o. Run the program again. In which direction does the motor connected to Port A turn now?
13. Try the same with Port C. Explain what Program 1 can do.
Day 3
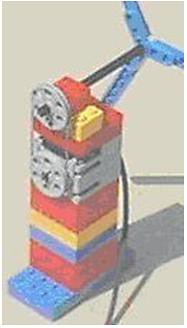
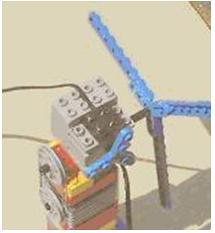
Constructing a Fan
Essential Skills: Students will identify the parts needed to construct a fan; problem solve by following appropriate directions; use visual cues to judge appropriate construction; select pre-programming options to set the fan in motion; use journals to reflect on the lesson.
 Engagement Activities:
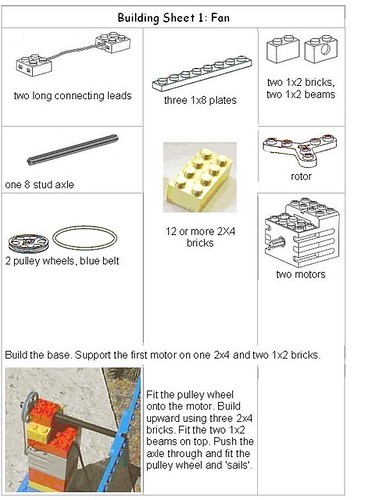
- Present handout Building a Fan and guide students to identify the parts needed for construction.
- In small groups students will build a fan.
- Once the fan is constructed, students will write in their journals. They are to explain the process of building a fan.
- Students are to keep their fan intact for the next lesson.
- Allow time for students to clean their areas and put all parts away.
Assessment: teacher observation, journal reflections
Adaptations: teacher proximity, cooperative grouping
Materials: Mindstorms For Schools, Robo Technology Set and amusment park set, Robolab 2.5 Software; handouts attached.
Math Standards: 5.4.9
Reading/LA Standards: 5.2.1, 5.2.2, 5.2.4, 5.5.6
Science Standards: 5.2.3, 5.2.7, 5.5.1, 5.2.7, 5.2.8, 5.6.1, 5.6.4
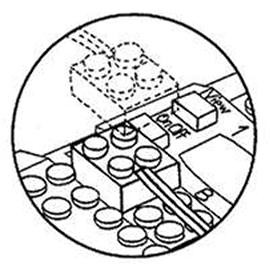
Building a Fan
Day 4
Robolab Programming
Essential Skills: Students will be able to use visual clues to decide on appropriateness of desired icons; use reading strategies to understand material written for a specific purpose; write a simple program using icons; maintain written records; work cooperatively and collaboratively.
Engagement Activities:
- In small groups students will return to their fans.
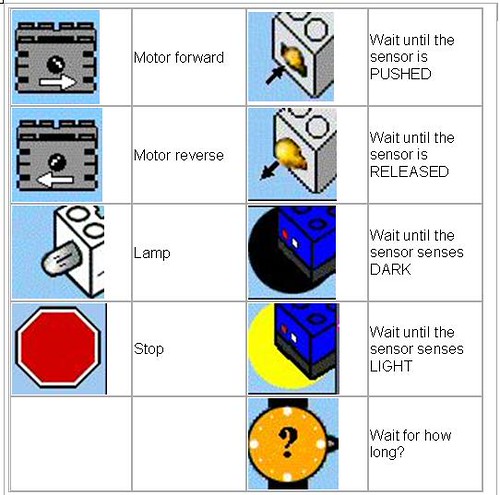
- Present the visual icons from the pilot level. Students will read through and discuss the different icons and what they represent.
- Students will follow instructions on handout pilot level 1 while recording their observations. Initiate whole group discussion.
- Have students follow instructions on handout pilot level 2, while recording observations. Initiate whole group instruction.
- Students are to disassemble the parts and clean up their areas.
Assessment: teacher observation, written observations, journal reflections
Adaptations: teacher proximity, cooperative grouping
Materials: Mindstorms For Schools, Robo Technology Set and Amusement park set, Robolab 2.5 Software; computers; handouts attached
Math Standards: 5.2.6, 5.7.1, 5.7.2, 5.7.3
Reading/LA Standards: 5.2.2, 5.5.6
Science Standards: 5.2.3, 5.2.4, 5.2.8, 5.5.1, 5.5.6
Icons from the Pilot Levels
Pilot Level 1
We are going to send instructions to the RCX to turn the fan's main sails.
- Connect the sails motor to Output A on the RCX.
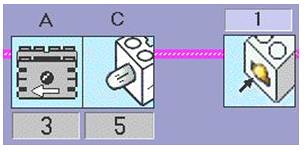
- Load Pilot Level 1 by clicking on the main menu screen:
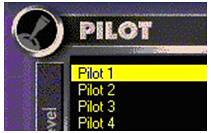
This is what you will see:
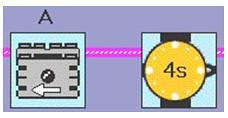
Don't change the icons! What do you think this program will do?
- Place the RCX close to the IR Tower. Turn the RCX on. Click the arrow:

This sends your instructions to the RCX. Watch the screen to see it downloading.
- Press Run on the RCX. What happens? Is this what you expected?
- Click on the motor icon to change the direction in which the sails turn. Click on the timer to choose how long you want the motor to run for. Send your program to the RCX and press Run.
- Describe what happens to the fan:
- Change back to the original direction. Make the sails turn for 10 seconds. Draw the icons which are on the screen:
Pilot Level 2Your activity is to write a program for the RCX to set the speed and direction of the fan's main sails, and turn the fantail.
- Connect the sails motor to Output A on the RCX. Add a new motor (fantail motor) at the top of the base as shown below. Connect the fantail motor to Output C on the RCX.
- Load Pilot Level 2 by clicking on the main menu screen:
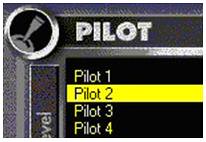
This is what you will see:
- Change the program to turn the fantail (connected to C). Click the lamp icon and change it to a motor.
- Click on the touch sensor icon, and change it to a timer.
- Place the RCX close to the IR Tower. Turn the RCX on. Click the arrow to download, then press Run on the RCX.
- Change the program so that the sail motor (A) turns rapidly and the fantail motor (C) turns slowly. Download and press Run on the RCX.
Which speeds did you select for the sails and fantail?
Day 5
Build and Control a Basic Car
Lego Mindstorms for schools 9785, 9786 Lego Educational Division, pp7.
Essential Skills: Students will be able to identify parts needed to construct a basic car; use visual cues to judge appropriate construction; create a program to set the car in motion; write in journals to reflect on the lesson.
Engagement Activities:
- In small groups students will follow instructions to Build a Basic Car. Use booklet #9725 (steps 1-6, add wheels).
- Using pilot 2, program the car to run at speed 5 for 2 seconds. Students will use a yard stick or tape measure to record the distance the car traveled. Discuss the differences in times and why the cars where not able to move the same distance.
- Write a prediction as to how far the car will travel in half the time. Reprogram the car to run for 1 second. Record the distance. Discuss the results and possible reasons for inconsistency.
- Use different wheels and repeat steps 2 and 3.
- Disassemble car.
- Write reflections in journals.
- Clean work area.
Assessment: teacher observation, journal reflections
Adaptations: teacher proximity, cooperative grouping
Materials: Mindstorms For Schools, Robo Technology Set and Amusement park set, Robolab 2.5 Software; booklet number 9725; computers; yardstick or tape measure; handouts attached
Math Standards: 5.2.1, 5.2.6, 5.4.9, 5.7.1, 5.7.2, 5.7.3
Reading/LA Standards: 5.2.1, 5.2.2, 5.5.6
Science Standards: 5.5.1, 5.2.3, 5.2.7, 5.2.8, 5.5.1, 5.6.1
Day 6
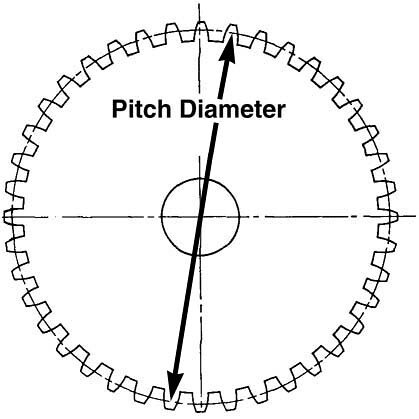
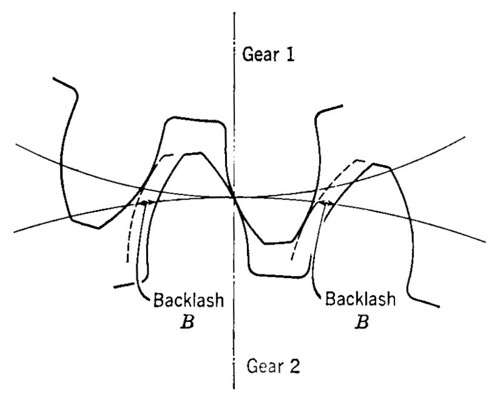
Gears
Essential Skills: The student will be able to distinguish between several kinds of gears, develop ratio statements for speed variance vis-à-vis small gear (8-tooth gear) to larger gear (i.e., 24-tooth gear), construct a gear train from given directions, use multiplication to achieve ratios for the constructed gear train, write in journals to reflect on the lesson..
Engagement Activities:
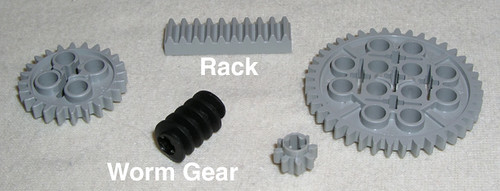
- Introduce the gear pages (following this lesson plan), and have the students identify and match each piece with a part in the Mindstorms Kit.
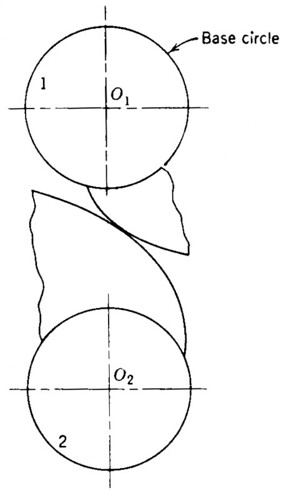
- Discuss the different kinds of gears (as identified by the number of teeth).
- Have the students record the number of times an 8-tooth gear has to turn to make a 24-tooth gear go around one time. (3 times)
- Explain and demonstrate that adding an 8-tooth gear on the same axle as the 24-tooth gear means that both gears will turn at the same number of revolutions
- Explain and demonstrate that adding a new axle with a 24-tooth gear has the same effect as in step 3. To prove this, have the student record the number of times each of the 8-tooth gears has to turn to make the new 24-tooth gear turn around only once. (1st one has to turn 9 times; 2nd has to turn 3)
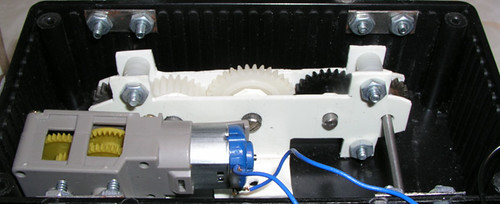
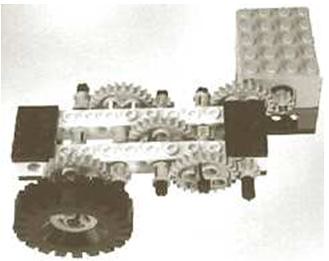
- Discuss and demonstrate the gear box (use picture) and how the ratio of 243:1 is achieved.
- Have students build their own gear boxes (according to the picture).
- Use journals to record the number of time the 1st gear has to turn to make the last gear go around once. Write reflections about these numbers.
- Clean work area. Leave gear trains intact. Be sure to replace all other Lego parts in proper storage areas.
Assessment: teacher observation/gear boxes/journal entries and reflections
Adaptations: teacher proximity/cooperative grouping/hands-on manipulative exercise
Materials: Mindstorms For Schools, Robo Technology Set and Amusement park set, Robolab 2.5 Software; computers; handouts attached
Math Standards: 5.2.1, 5.2.6, 5.4.9, 5.6.3, 5.6.4, 5.7.1, 5.7.2, 5.7.3, 5.7.5, 5.7.6, 5.7.7, 5.7.8, 5.7.9
Reading/LA Standards: 5.2.1, 5.4.1, 5.4.5, 5.5.6
Science Standards: 5.1.1, 5.2.3, 5.2.4, 5.2.6, 5.2.7, 5.5.1, 5.6.4, 5.3.12
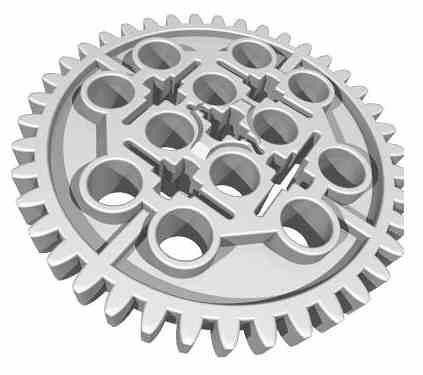
40 tooth gears
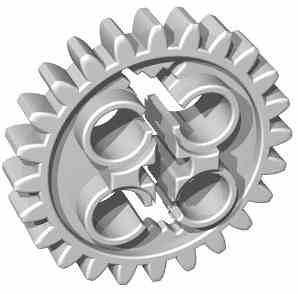
24 tooth gears
16 tooth gears
8 tooth gears
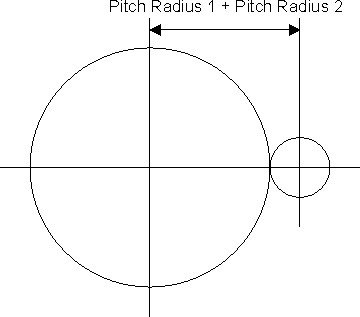
3 to 1 gear ratio
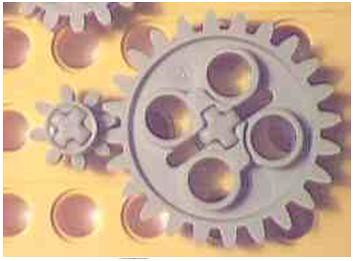
The 8 tooth gear must rotate 3 times to make the 24 tooth gear rotate once.
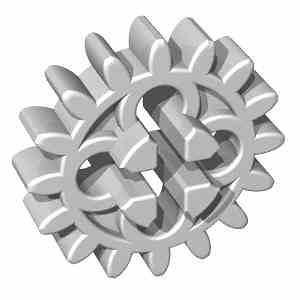
Two Gears on the same axle

Both the 24 tooth gear and the 8 tooth gear are on the same axle. Therefore both gears will rotate the same number of revolutions. This means that if the 8 tooth gear goes around 3 times, so does the 24 tooth gear.
Gear TrainsA group of gears connected together is called a gear train. This allows a much larger gear ratio.
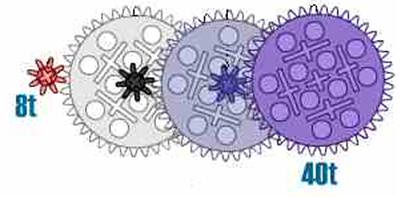
Determine how many times that the small 8 tooth gear on the left has to turn to make the large 40 tooth gear on the right turn one revolution.
A 243 to 1 Gear Train using 8 and 24 tooth gears
Day 7
Snail Car
Essential Skills: The student will be able to identify parts needed to construct a snail car of their own design; use visual cues to judge appropriate design aspects; construct and attach a gear train to make the car go slowly; create a program to set the car in motion; compete against groups to see who has the slowest car; write in journals to reflect on the lesson.
Engagement Activities:
- In small groups students will design a basic car that will allow for the attachment of the gear train they built last time (see picture of gear train to gain ideas of motor and wheel attachment). For basic car constructions see booklet #9725.
- Using pilot 1, build a program that will allow the motor to run for a specified length of time. Program the car to run for 500.00 (500 seconds). If the students use a gear ratio that is approximately 250/1 the car will take longer than 500 seconds to travel 12". In that case have them wire and program a push button sensor to input 2. Since the sensor will not be pressed the car will run forever.
- Use additional pieces to decorate cars.
- Hold a competition between the groups to see which car will travel the slowest. (Use electrical tape to display a start line and a finish line twelve inches apart).
- Disassemble the car.
- Write reflections in journals.
- Clean work area.
Assessment: teacher observation/snail cars/competition/journal reflections
Adaptations: teacher proximity/visual cues/manipulative exercises/cooperative grouping
Materials: Mindstorms For Schools, Robo Technology Set and Amusement park set, Robolab 2.5 Software; computers; handouts attached
Math Standards: 5.2.6, 5.4.9, 5.7.1, 5.7.2, 5.7.3
Reading/LA Standards: 5.2.1, 5.2.2, 5.5.6
Science Standards: 5.2.3, 5.2.7, 5.5.1, 5.2.8, 5.6.1
Day 8
Merry-Go-Round (Enterprise)
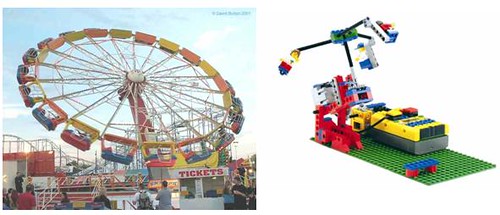
Essential Skills: Students will identify parts needed to construct merry go round (part of the LEGO amusement park); describe the relationship between beams and axles; use problem solving skills and visual cues to judge appropriate construction; run a pre-existing program; write reflections in journals.
Engagement Activities:
- With students in groups, conduct a discussion of all the steps necessary to build the merry go round (student booklet 9725).
- Verbally quiz students on the relationship between axles and beams. (Example: a size 10 axle will have the same length as a 10 unit beam)
- Follow the steps in booklet 9725 to build the merry go round.
- Use program pilot level 3 (amusement park, merry go round 1) to set the creation into motion.
- Leave the merry go round in tact.
- Clean area.
- Write reflections in journals. Prompts: Which part of the lesson did you enjoy the most? Explain. Which park of the lesson did you like the least? Explain.
Assessment: teacher observation, journal reflections
Adaptations: teacher proximity, cooperative grouping
Materials: Mindstorms for Schools, Robo Technology Set and Amusement park set, Robolab 2.5 Software; computers
;
Math Standards: 5.2.6, 5.7.1, 5.7.2, 5.7.3, 5.7.7, 5.7.9
Reading/LA Standards: 5.2.1, 5.2.2, 5.5.6
Science Standards: 5.1.1, 5.2.3, 5.2.4, 5.2.7, 5.2.8, 5.5.1, 5.6.4
Day 9
Merry-Go-Round Part 2
Essential Skills: The student will be able to write and run a program; build and program a creation using an additional motor; record new discoveries; write in journals to reflect on the lesson.
Engagement Activities:
- Use pilot level 4 to program the merry go round to tilt up and down, and turn right and left.
- Test the program.
- Program the merry go round to turn right and at the same time tilt up, then turn left and at the same time tilt down. Test the program.
- Use another motor to create an additional amusement park ride.
- Record the directions needed to build the new creation
- Place the new ride on the same plane as the merry go round.
- Disassemble the parts.
- Clean the area.
- Use journals to write reflections.
Assessment: teacher observation, journal reflections
Adaptations: teacher proximity, cooperative grouping
Materials: Mindstorms For Schools, Robo Technology Set and Amusement park set, Robolab 2.5 Software; computers
Math Standards: 5.2.6, 5.7.1, 5.7.2, 5.7.3, 5.7.7, 5.7.9
Reading/LA Standards: 5.2.1, 5.2.2, 5.5.6
Science Standards: 5.1.1, 5.2.3, 5.2.4, 5.2.7, 5.2.8, 5.5.1, 5.6.4
Day 10
Design Project
Essential Skills: The student will be able to work cooperatively in groups; construct a final project, using a pre-determined design or a design of their own creation; create a computer program to motivate their design; use writing skills to produce a written document, specifying "how-to" directions on building their group’s project.
Engagement Activities:
- Each group will decide on a final project (They may choose items from previous activities, items from other LEGO booklets, or items of their own creation).
- Students will build their project.
- Each group will write a program to make their project move.
- Teacher will collect all directions (from students who constructed pre-designed projects).
- Each individual student will write step-by-step, "how-to" directions for constructing the group project.
- Keep projects intact for school-wide sharing.
Assessment: teacher observation, how-to directions
Adaptations: teacher proximity, cooperative grouping
Materials: Mindstorms For Schools, Robo Technology Set and Amusement park set, Robolab 2.5 Software; computers, LEGO instruction booklets
Math Standards: 5.2.6, 5.7.1, 5.7.2, 5.7.3, 5.7.7, 5.7.9
Reading/LA Standards: 5.2.1, 5.2.2, 5.5.6
Science Standards: 5.1.1, 5.2.3, 5.2.4, 5.2.7, 5.2.8, 5.5.1, 5.6.4
source : www.lego.com